This documentation is for the proprietary Chainloop Platform. If you are looking for the Open Source Evidence Store documentation, please refer to the Chainloop Evidence Store guide
Introduction
The Chainloop platform has two top-level components: Chainloop Evidence Store and Chainloop Platform. These are deployed using one unified helm chart. Chainloop Evidence Store- The source code can be found in this repository https://github.com/chainloop-dev/chainloop
- It comprises two server-side components, a control plane, and a content-addressable proxy.
- The source code of the server components is the property of Chainloop Inc.
- The Helm Chart can be found here oci://chainloop.azurecr.io/chart/chainloop-platform
- It’s comprised of three server-side components, a backend, a frontend and a nats.io server.
Retrieve Private OCI Registry credentials.
To pull the Helm Charts and container images you’ll need to authenticate with a private OCI registry managed. If you don’t have them yet, please contact the Chainloop team. Once you get the creds, you can give it a try by authenticating locally and pulling the latest version of both Helm Charts.Configure credentials for deployment
You have two options to consume the provided Helm Charts and container images in your Kubernetes cluster:Option 1: Pull images and Chart directly from Private Azure Registry
To pull the images, you’ll need to store these credentials as a K8s secret in the cluster where you will deploy the Helm Charts. Later, they will be referenced in the Helm charts as imagePullSecrets.Option 2: Relocate Helm Chart and images to your own registry
Both charts are compatible with relocation processes performed by the Helm Relocation Plugin. This means that you can easily import the Helm Charts and Container images provided by the Chainloop team into your registry, even behind the firewall. This is a two-step process (wrap -> unwrap)- Pull all the container images and Helm chart and wrap them in an intermediate tarball.
- If needed, transfer that tarball to your air-gap environment via an offline medium
- Unwrap the tarball and push container images, update the Helm Chart with new image references, and push it to the target registry.
Deploy and Configure in Kubernetes
The Chainloop platform has two top-level components: Chainloop Evidence Store and Chainloop Platform. We have created one unified helm chart to simplify installation process. This is an example of a final and more detailed picture of how both Chainloop Evidence Store and Chainloop platform could look in AWS, leveraging AWS services such as RDS or AWS Secret Manager.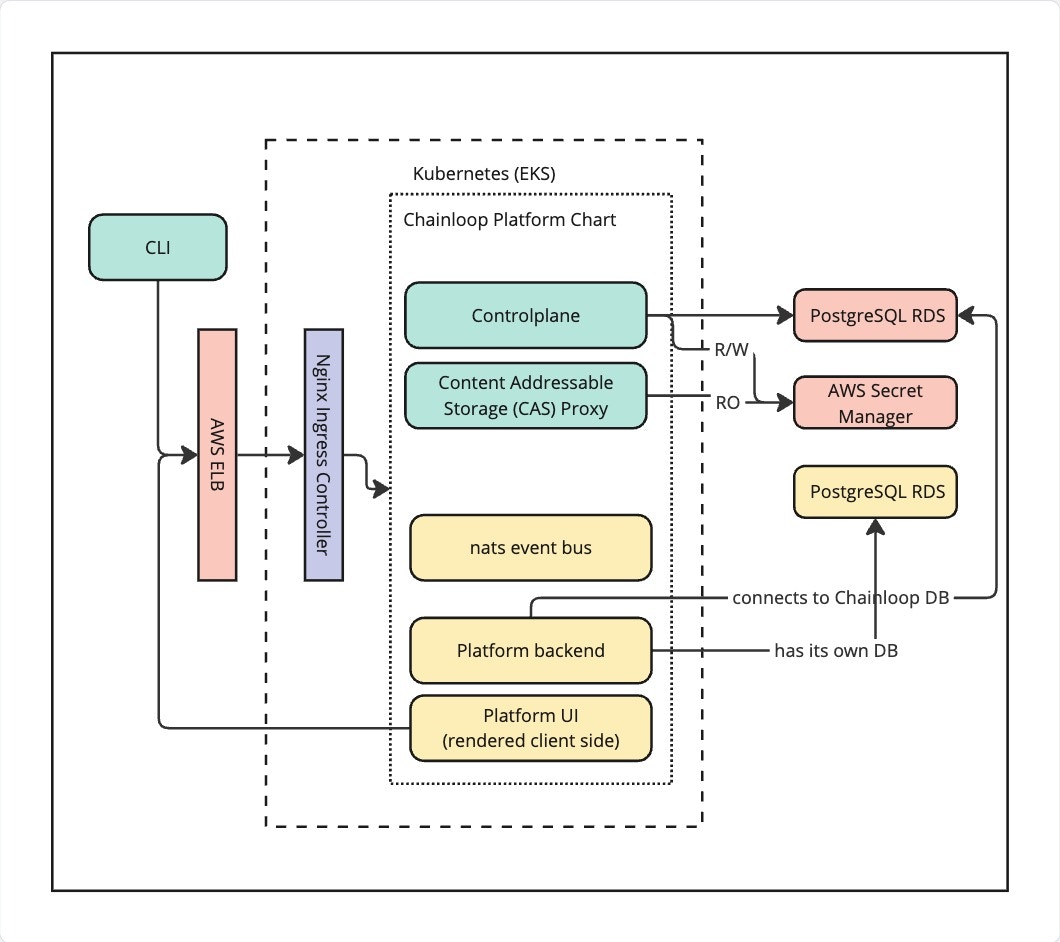
Step 1 - Deploy Platform Chart
Please refer to Chart Readme file that can be found on the chart tarball that can be pulled like this.Step 2 - Custom Contracts
Now you should be able to update your contracts with policies and policy groups from the Chainloop Platform like this.Example Contract file
Step 3 (optional) - Configure Secret Manager in platform Chart
To enable notifications integrations, you must configure the secret manager to be able to store and retrieve secrets. The configuration is similar to the one you have already setup in the Chainloop Chart.Platform Chart values.yaml
Step 4 (optional) - Setup SMTP configuration
To enable email notifications, you need to configure the SMTP settings in the Chainloop Platform backend Helm chartvalues.yaml file like this:
Platform Chart values.yaml
Step 5 (optional) - Configure users auto-onboarding
This step allows automatically onboarding users to specific organizations and user groups. Follow this guide to configure Chainloop Platform for auto-provisioning.Step 6 (optional) - Restrict organization creation
This step allows restricting organization creation to specific users. Follow this guide to configure Chainloop Platform for restricting organization creation.Step 7 (optional) - Configure Keyless attestation for GitLab
1 - Configure Federated Authentication in Controlplane
Then you’ll update the Chainloop Vault controlplane Helm chart values.yaml file like thisChainloop Chart values.yaml
2 - Enable GitLab AuthN and AuthZ in backend
To support GitLab keyless attestation, the platform backend needs to be configured to be able to:- 2.1 - Authenticate the incoming tokens
- 2.2 - Enable authorization, which means
- Allow the user to onboard GitLab repositories
- Authorize the incoming tokens against the onboarded repositories
Platform Chart values.yaml
Platform Chart values.yaml
Step 8 (optional) - Expose MCP server
To enable access to Chainloop Model Context Protocol (MCP) server, you need to update the Chainloop platform chartvalues.yaml to expose the MCP server through an ingress, like any other resource
Platform Chart values.yaml
https://[your-mcp-hostname]/sse for example https://mcp.app.chainloop.dev/sse