> ## Documentation Index
> Fetch the complete documentation index at: https://docs.chainloop.dev/llms.txt
> Use this file to discover all available pages before exploring further.
# Chainloop Platform Helm Chart (Deprecated)
> How to deploy and configure the Chainloop Platform in Kubernetes
This deployment guide has been deprecated and replaced by the [Enterprise edition](/guides/deployment/chainloop-ee) documentation. If you are looking to migrate from the previous Platform+OSS charts to the new `chainloop-ee` chart, please refer to the [Migration Guide](/guides/deployment/guides/migration-guide).
This documentation is for the proprietary Chainloop Platform. If you are looking for the Open Source Evidence Store documentation, please refer to the [Chainloop Evidence Store](/guides/deployment/oss) guide
This guide is focused on Kubernetes deployment. If you are evaluating the platform, you also have a Docker Compose option available. Check out the [Evaluate Chainloop Platform](/guides/evaluate-platform) guide.
## Migrate to new Helm Chart
The `chainloop-ee` chart replaces both the separate Platform and OSS charts with a single unified Helm chart. Migration is straightforward — most configuration keys remain in the same sections.
For step-by-step instructions, see the [Migration Guide](/guides/deployment/guides/migration-guide).
## Introduction
The Chainloop platform has two top-level components: Chainloop Evidence Store and Chainloop Platform. These are deployed using two different Helm Charts.
We have a **new deployment method available in preview** that simplifies the deployment process. For more information please refer to [this other guide](/guides/deployment/chainloop-ee)
**Chainloop Evidence Store**
* The source code can be found in this repository [https://github.com/chainloop-dev/chainloop](https://github.com/chainloop-dev/chainloop)
* It is deployed using the Helm Chart that can be found upstream here or its relocated version here oci://chainloop.azurecr.io/chart/chainloop
* It comprises two server-side components, a control plane, and a content-addressable proxy.
**Chainloop Platform**
* The source code of the server components is the property of Chainloop Inc.
* The Helm Chart can be found here oci://chainloop.azurecr.io/chart/chainloop-platform
* It's comprised of three server-side components, a backend, a frontend and a nats.io server.
The Chainloop platform components **are meant to extend and enhance the capabilities of Chainloop OSS evidence store**, and hence, they require access to a running instance of Chainloop Evidence Store.
## Retrieve Private OCI Registry credentials.
To pull the Helm Charts and container images you'll need to authenticate with a private OCI registry managed. If you don't have them yet, please [contact](https://app.chainloop.dev/request-access) the Chainloop team.
Once you get the creds, you can give it a try by authenticating locally and pulling the latest version of both Helm Charts.
```bash theme={"dark"}
# Authenticate locally
$ docker login -u [username] -p [creds] chainloop.azurecr.io
# Chainloop Evidence Store Chart
$ helm fetch oci://chainloop.azurecr.io/chart/chainloop
# Chainloop Platform Chart
$ helm fetch oci://chainloop.azurecr.io/chart/chainloop-platform
$ ls chainloop-*
chainloop-1.77.2.tgz chainloop-platform-0.12.0.tgz
```
## Configure credentials for deployment
You have two options to consume the provided Helm Charts and container images in your Kubernetes cluster:
### Option 1: Pull images and Chart directly from Private Azure Registry
To pull the images, you'll need to store these credentials as a K8s secret in the cluster where you will deploy the Helm Charts. Later, they will be referenced in the Helm charts as imagePullSecrets.
```bash theme={"dark"}
$ kubectl create secret docker-registry regcred-azure \
--docker-server=https://chainloop.azurecr.io \
--docker-username=[your-username] \
--docker-password=[your credentials]
```
### Option 2: Relocate Helm Chart and images to your own registry
Both charts are compatible with relocation processes performed by the [Helm Relocation Plugin](https://github.com/vmware-labs/distribution-tooling-for-helm). This means that you can easily import the Helm Charts and Container images provided by the Chainloop team into your registry, even behind the firewall.
This is a two-step process (wrap -> unwrap)
* Pull all the container images and Helm chart and wrap them in an intermediate tarball.
* If needed, transfer that tarball to your air-gap environment via an offline medium
* Unwrap the tarball and push container images, update the Helm Chart with new image references, and push it to the target registry.
For example, to relocate from Azure to your own Harbor registry.
```bash theme={"dark"}
helm dt wrap oci://chainloop.azurecr.io/chart/chainloop-platform
# 🎉 Helm chart wrapped into "chainloop-platform-0.11.0.wrap.tgz"
# Now you can take the tarball to an air-gapped environment and unwrap it like this
helm dt unwrap chainloop-platform-0.11.0.wrap.tgz oci://my-repo.harbor.io --yes
# Unwrapping Helm chart "chainloop-platform-0.11.0.wrap.tgz"
# ✔ All images pushed successfully
# ✔ Helm chart successfully pushed
#
# 🎉 Helm chart unwrapped successfully: You can use it now by running "helm install oci://my-repo.harbor.io/chainloop-platform --generate-name"
```
The relocated Helm Charts will be ready to be used, pointing to the images also relocated to the end registry.
## Deploy and Configure in Kubernetes
The Chainloop platform has two top-level components: Chainloop Evidence Store and Chainloop Platform. These are deployed using two different Helm Charts.
We are working on an umbrella Helm Chart that will contain both evidence store and platform charts. This will greatly simplify the deployment, configuration and update process, stay tuned!
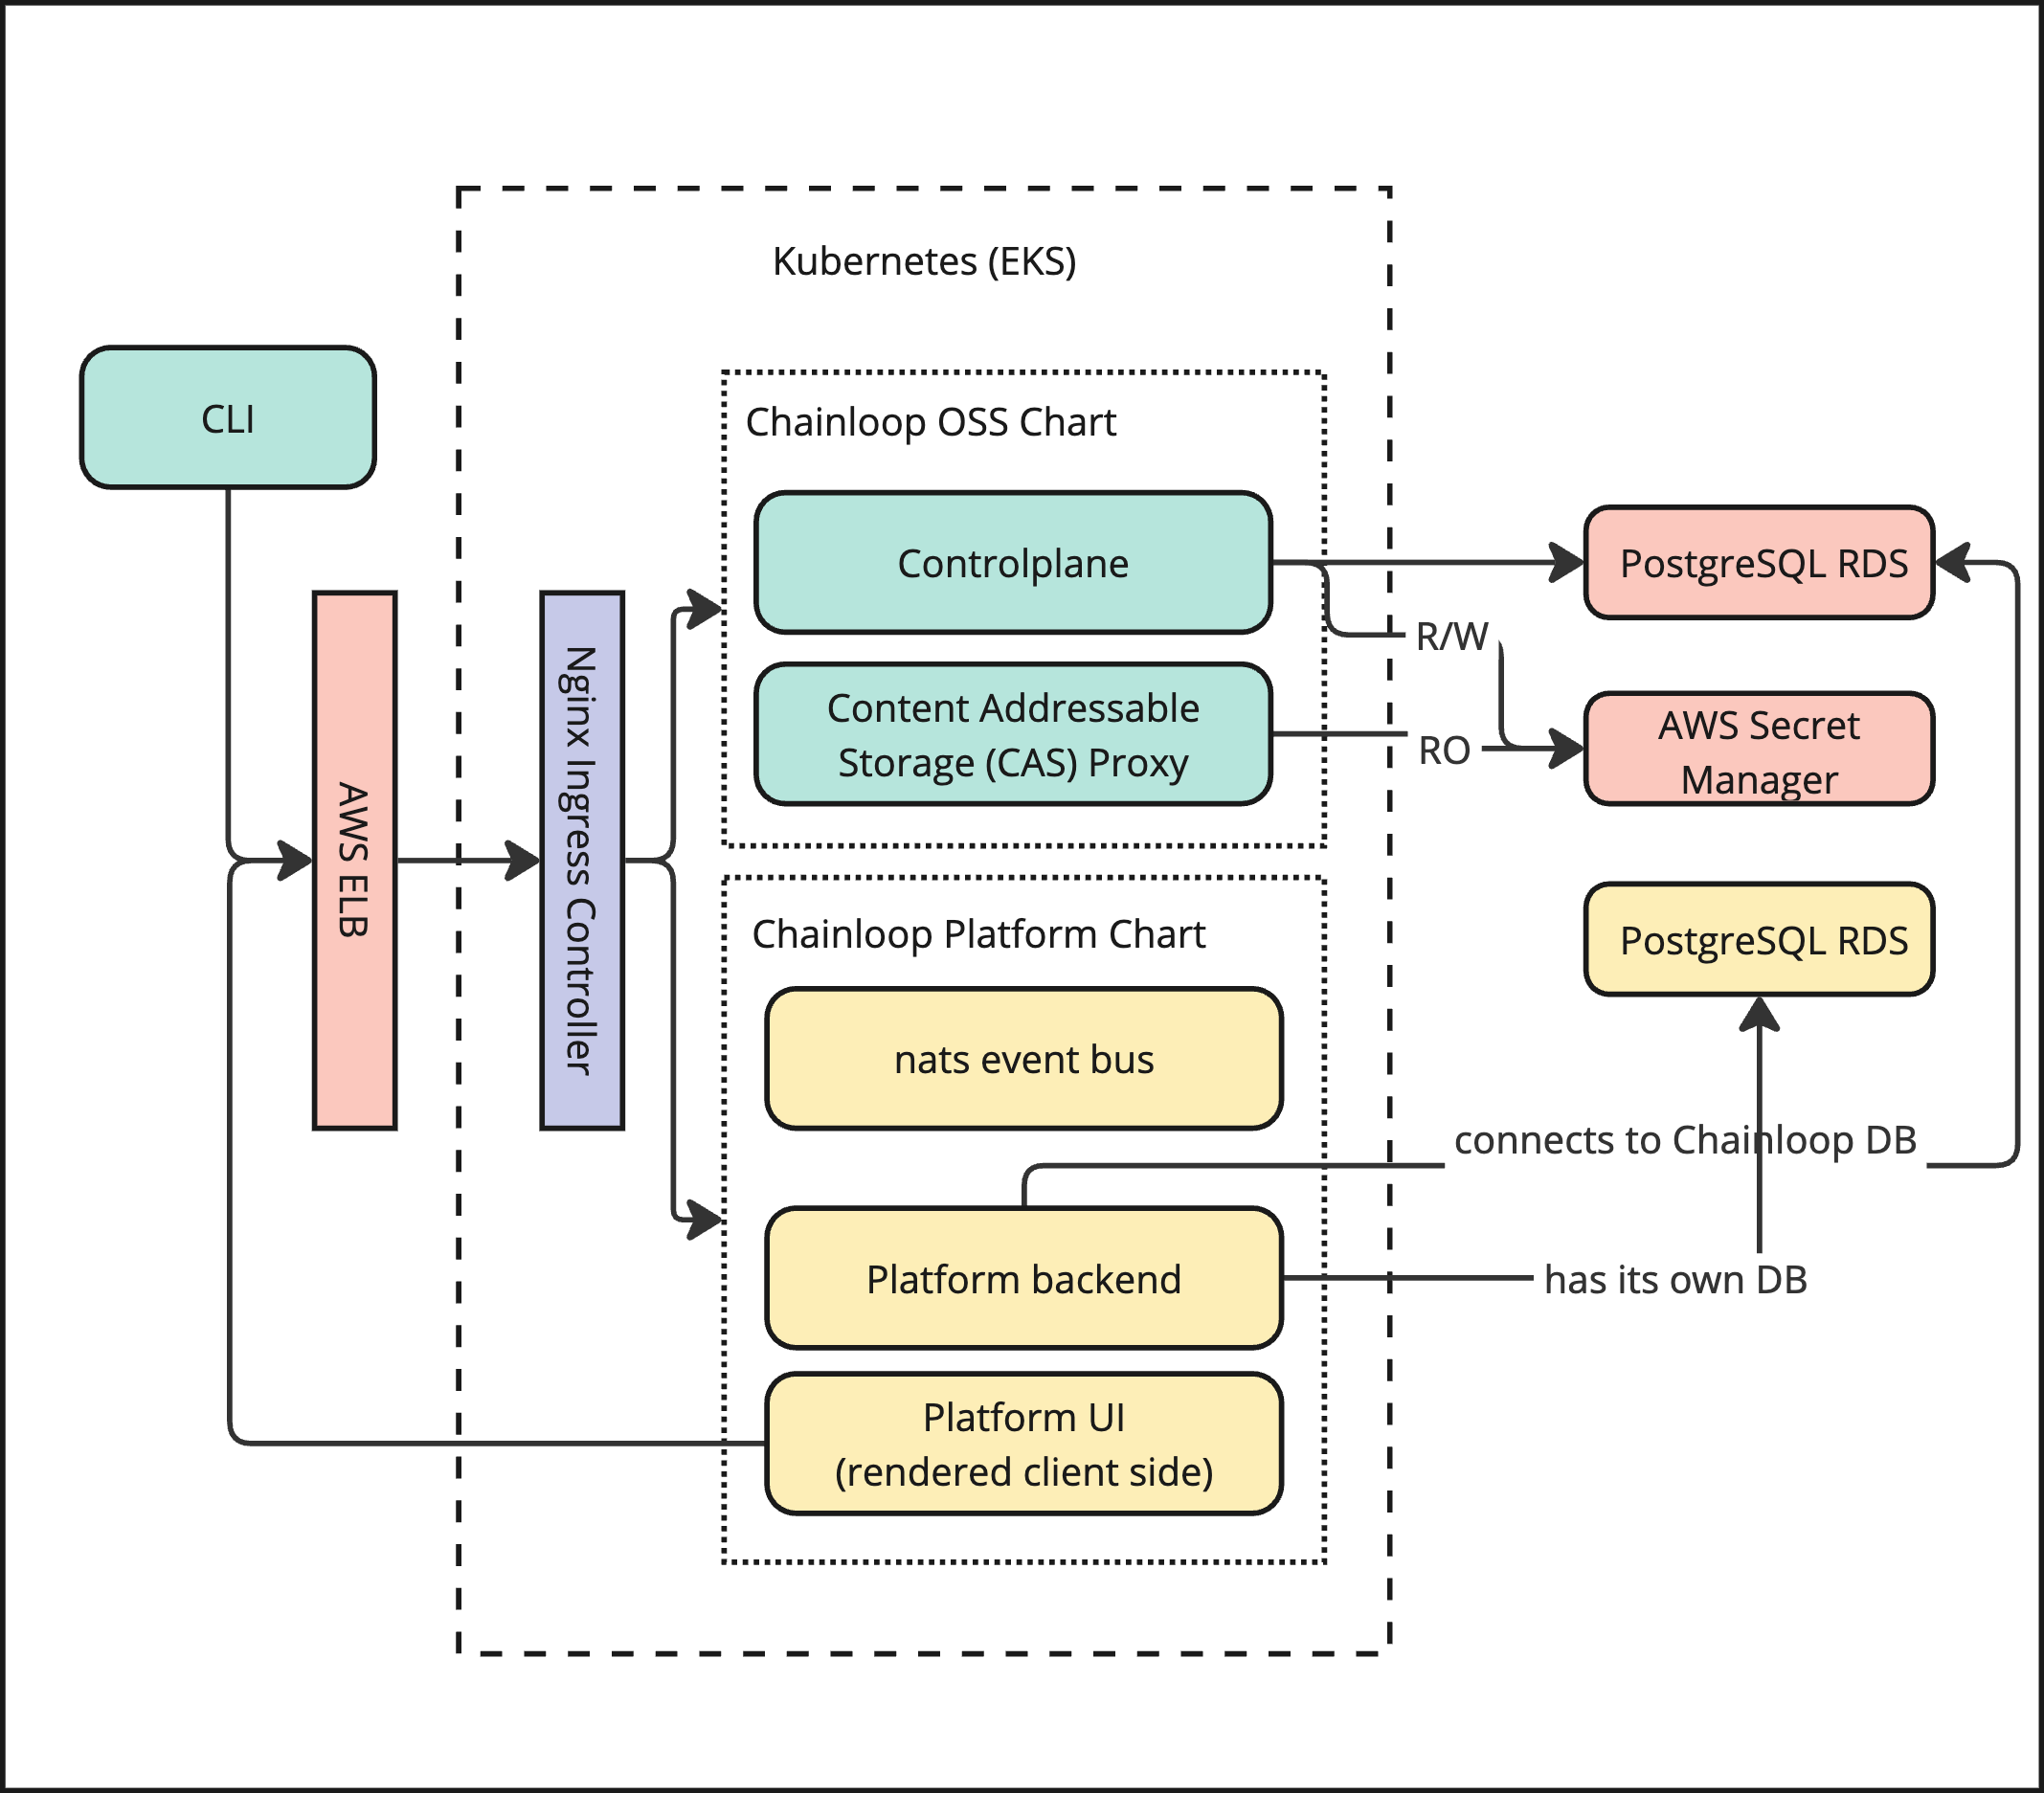
This is an example of a final and more detailed picture of how both Chainloop Evidence Store and Chainloop platform could look in AWS, leveraging AWS services such as RDS or AWS Secret Manager.
 For more details on configuring each component, refer to their respective Readme files in the Helm Charts.
### Step 1 - Deploy Evidence Store Chart
Please refer to Chart Readme file that can be found on the chart tarball that can be pulled like this
```bash theme={"dark"}
helm fetch oci://chainloop.azurecr.io/chart/chainloop
```
### Step 2 - Deploy Platform Chart
Please refer to Chart Readme file that can be found on the chart tarball that can be pulled like this
```bash theme={"dark"}
helm fetch oci://chainloop.azurecr.io/chart/chainloop-platform
```
Once you have the two main components up and running, the next step is to configure Chainloop's evidence store to leverage some advanced features by talking to the proprietary components.
### Step 3 - Enable Built-in Library of Policies
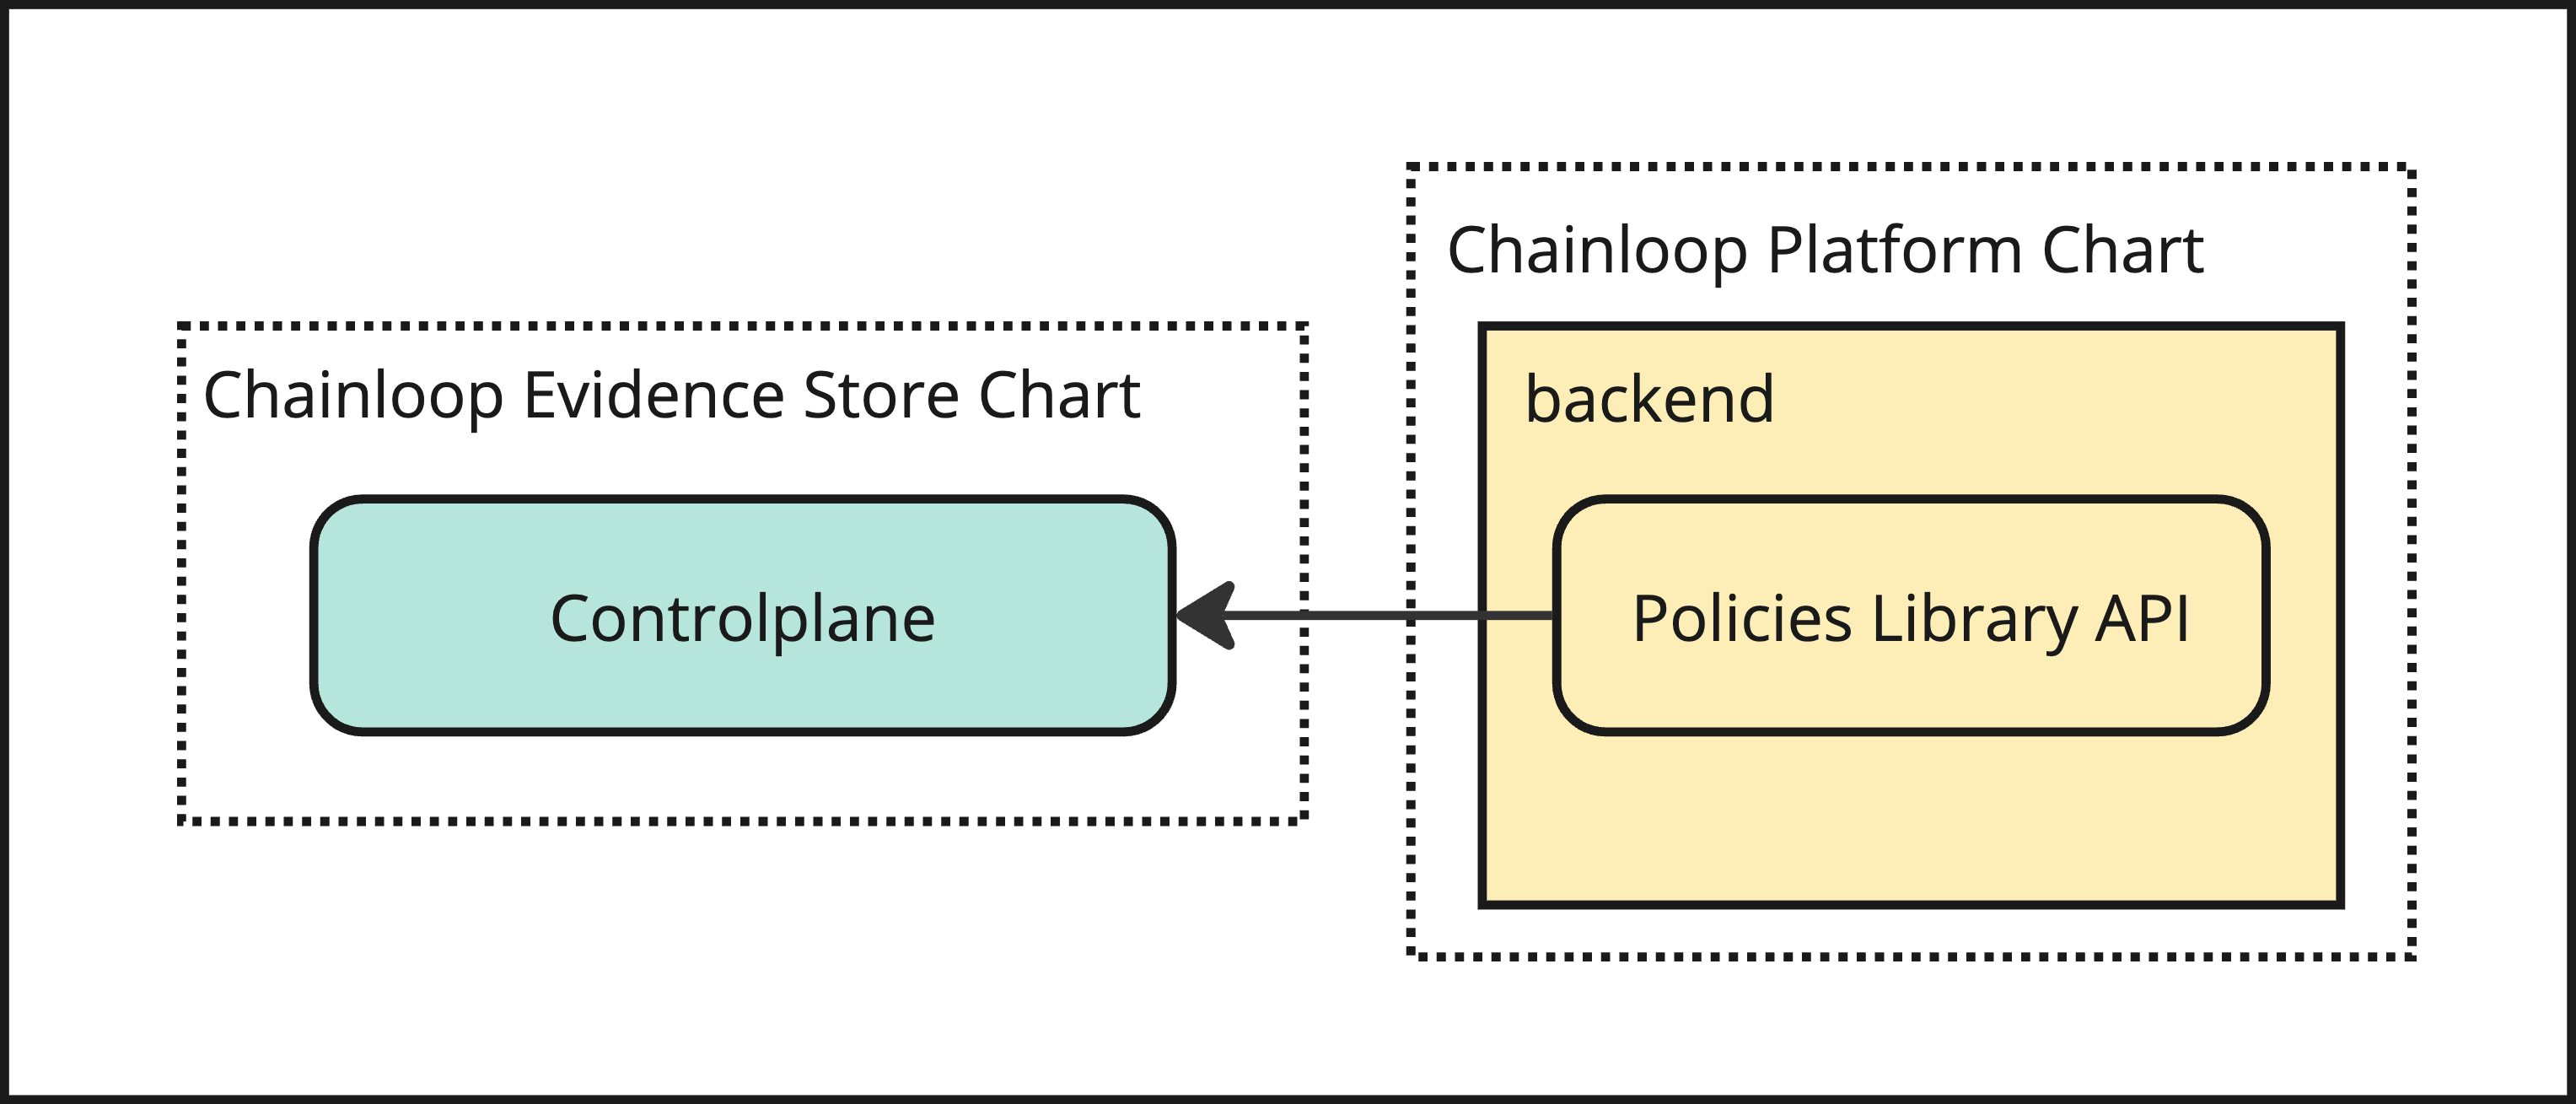
The Chainloop platform backend exposes through its API a curated library of policies. To leverage it, some configuration changes needs to be done in the Chainloop Vault controlplane Helm chart values.yaml file.
For more details on configuring each component, refer to their respective Readme files in the Helm Charts.
### Step 1 - Deploy Evidence Store Chart
Please refer to Chart Readme file that can be found on the chart tarball that can be pulled like this
```bash theme={"dark"}
helm fetch oci://chainloop.azurecr.io/chart/chainloop
```
### Step 2 - Deploy Platform Chart
Please refer to Chart Readme file that can be found on the chart tarball that can be pulled like this
```bash theme={"dark"}
helm fetch oci://chainloop.azurecr.io/chart/chainloop-platform
```
Once you have the two main components up and running, the next step is to configure Chainloop's evidence store to leverage some advanced features by talking to the proprietary components.
### Step 3 - Enable Built-in Library of Policies
The Chainloop platform backend exposes through its API a curated library of policies. To leverage it, some configuration changes needs to be done in the Chainloop Vault controlplane Helm chart values.yaml file.
 ```yaml Chainloop Chart values.yaml theme={"dark"}
controlplane:
# tell the chainloop controlplane to pick the policies from the platform backend
policy_providers:
- name: builtin # keep this as is
default: true # keep this as is
# You can use the internal k8s service name for example
# url: http://chainloop-platform-backend.platform-prod.svc.cluster.local/v1
url: [your-backend-api.com]/v1
```
Once you do it, you should be able to update your contracts with policies and policy groups from the Chainloop Platform like this.
```yaml Example Contract file theme={"dark"}
# This is a Chainloop Workflow Contract file
# That attaches policies and groups from the Chainloop Platform just by referencing them by name
apiVersion: chainloop.dev/v1
kind: Contract
metadata:
name: example-contract
spec:
policies:
attestation:
- ref: source-commit
materials:
- ref: sbom-ntia
policyGroups:
- ref: sbom-quality
```
You can learn more about how to use policies [here](/concepts/policies).
### Step 4: Configure Controlplane and CAS clients in backend
In order to enable advanced features like manual evidence compliance capabilities and more, you need to configure the Chainloop Platform backend to be able to talk to the Chainloop Controlplane and CAS.
```yaml Chainloop Chart values.yaml theme={"dark"}
controlplane:
# tell the chainloop controlplane to pick the policies from the platform backend
policy_providers:
- name: builtin # keep this as is
default: true # keep this as is
# You can use the internal k8s service name for example
# url: http://chainloop-platform-backend.platform-prod.svc.cluster.local/v1
url: [your-backend-api.com]/v1
```
Once you do it, you should be able to update your contracts with policies and policy groups from the Chainloop Platform like this.
```yaml Example Contract file theme={"dark"}
# This is a Chainloop Workflow Contract file
# That attaches policies and groups from the Chainloop Platform just by referencing them by name
apiVersion: chainloop.dev/v1
kind: Contract
metadata:
name: example-contract
spec:
policies:
attestation:
- ref: source-commit
materials:
- ref: sbom-ntia
policyGroups:
- ref: sbom-quality
```
You can learn more about how to use policies [here](/concepts/policies).
### Step 4: Configure Controlplane and CAS clients in backend
In order to enable advanced features like manual evidence compliance capabilities and more, you need to configure the Chainloop Platform backend to be able to talk to the Chainloop Controlplane and CAS.
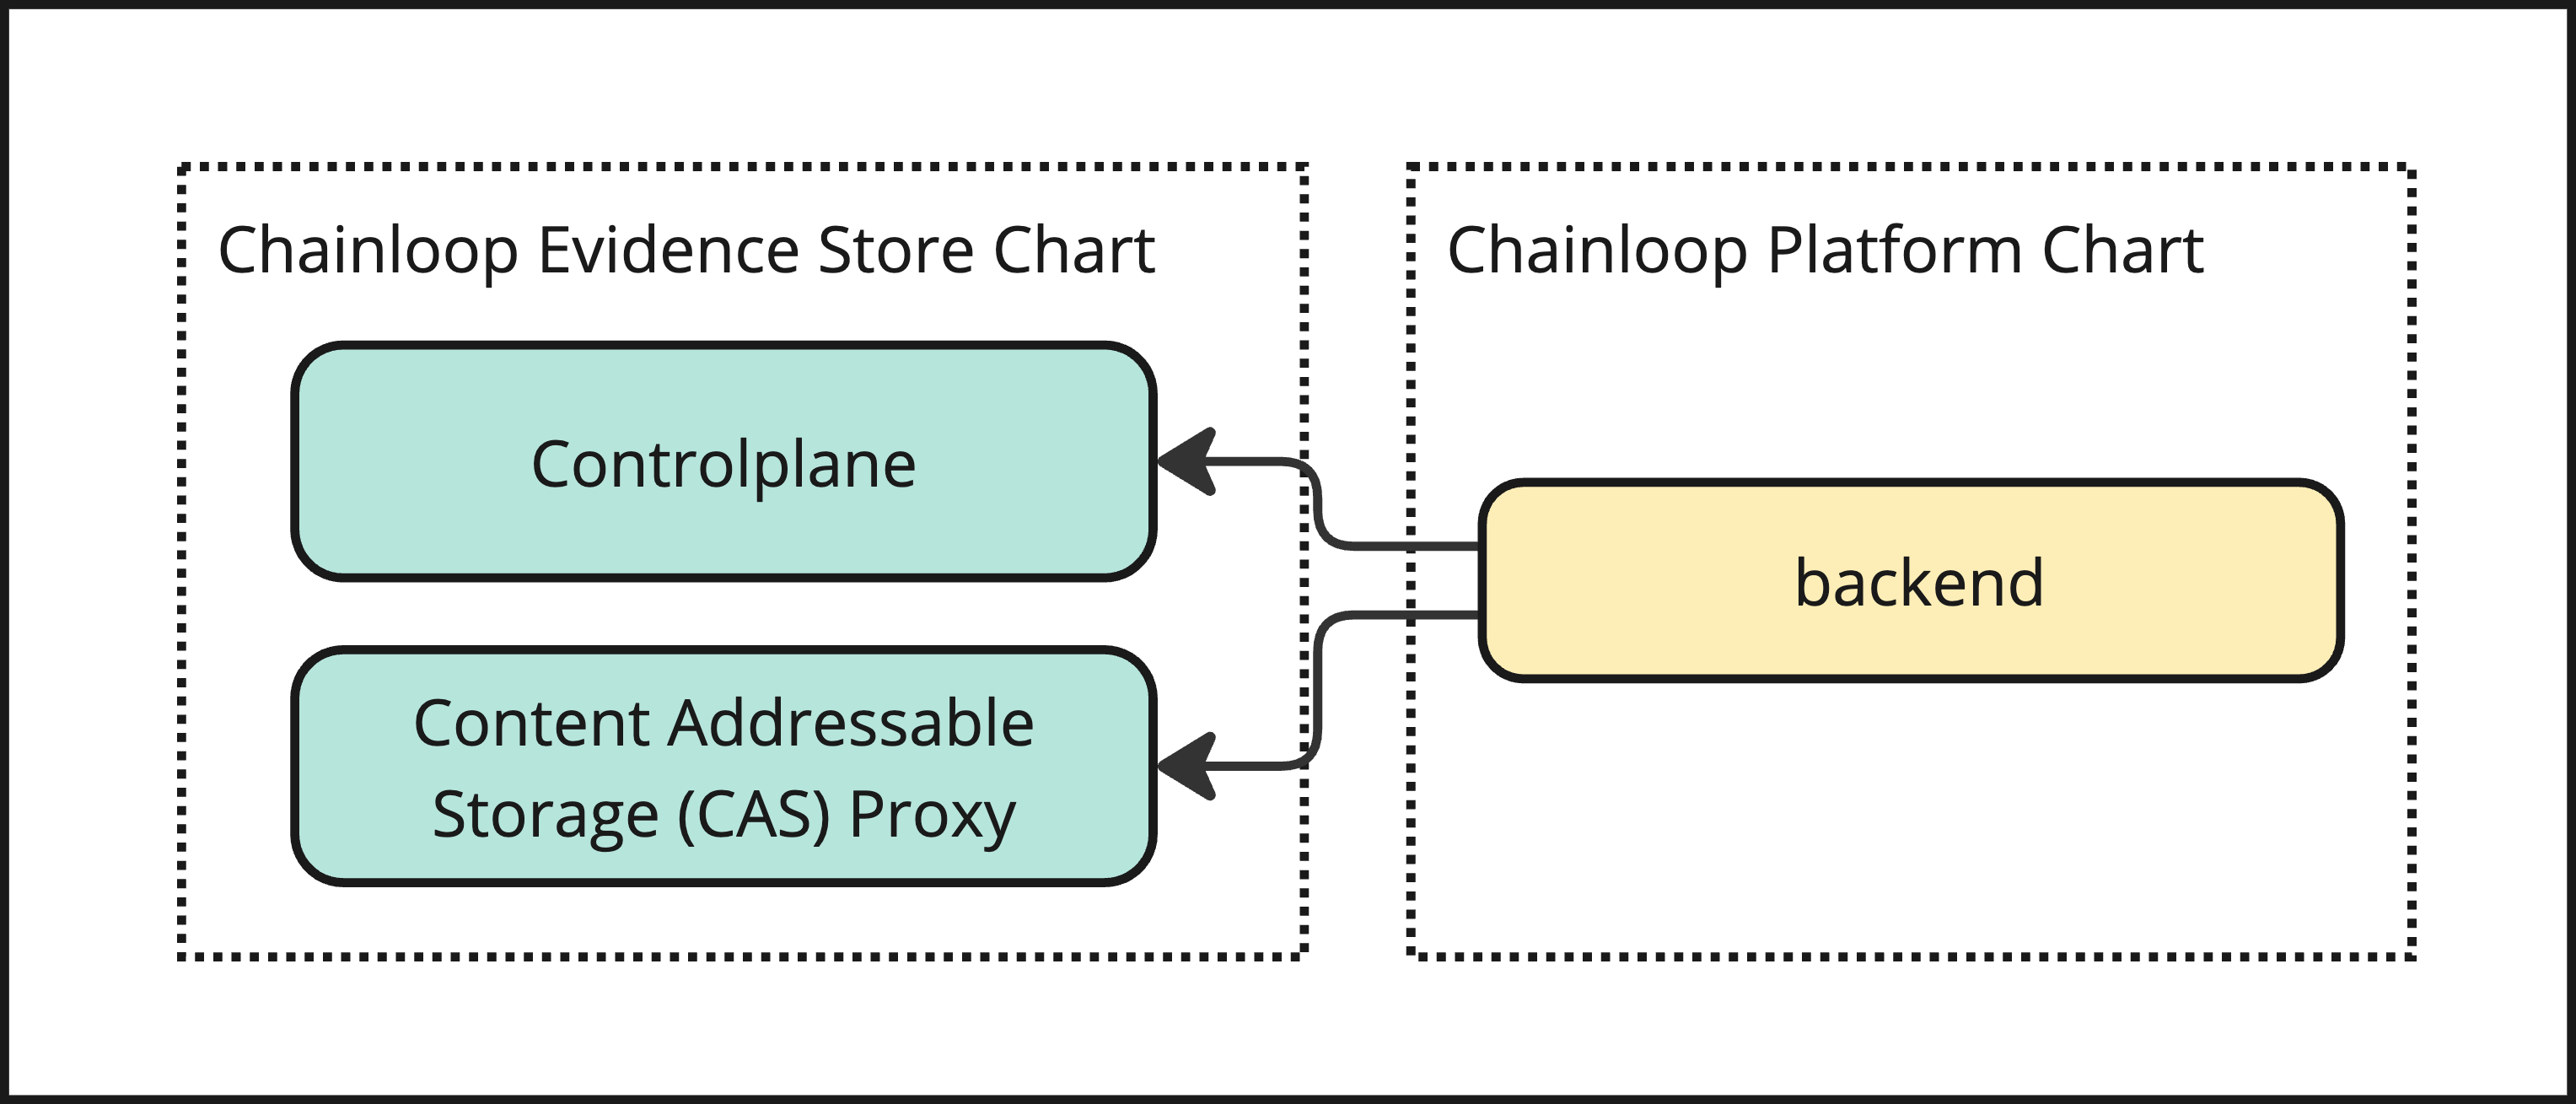 This can be done by updating the platform backend Helm chart values.yaml file like this:
```yaml Platform Chart values.yaml theme={"dark"}
backend:
controlplane_api:
# You can use internal DNS names i.e my-controlplane.internal.svc.cluster.local
# The gRPC endpoint for the controlplane API
# for example chainloop-controlplane-api.chainloop-prod.svc.cluster.local:80
addr: [your-controlplane-gRPC-api-hostname]:[port]
insecure: false # set to true if you don't have enabled TLS authentication in the gRPC API
cas_api:
# You can use internal DNS names
# for example chainloop-cas-api.chainloop-prod.svc.cluster.local:80
addr: [your-cas-gRPC-api-hostname]:[port]
insecure: false
```
### Step 5 - Connect to NATS event bus
Many of the advanced features in Chainloop Platform require the use of the NATS event bus. The platform Helm Chart deployed a Nats.io server, so the next step is to configure the controlplane to connect to it.
To find the hostname, you can query the service like this
```bash theme={"dark"}
kubectl get svc -l app.kubernetes.io/name=nats -o name
service/chainloop-platform-nats
```
In this example, `chainloop-platform-nats` is what you will use as the hostname or the FQDN `chainloop-platform-nats.[my-namespace].svc.cluster.local`. if you are connecting from another namespace.
Then you'll update the Chainloop Vault controlplane Helm chart `values.yaml` file like this:
```yaml theme={"dark"}
controlplane:
# The Chainloop Platform backend exposes a NATS server that can be used to receive audit logs
nats:
# Enable the NATS server
enabled: true
# hostname where the NATS server is running, for example, [nats-service-name].[namespace].svc.cluster.local
host: "my-nats-uri" # for example chainloop-platform-nats.platform-prod.svc.cluster.local
```
This example shows an unauthenticated Nats server configuration. We do not recommend this setup, please make sure you add authentication to your nats server and update the previous settings accordingly.
### Step 6 (optional) - Configure Secret Manager in platform Chart
To enable [notifications integrations](/concepts/notifications), you must configure the secret manager to be able to store and retrieve secrets. The configuration is similar to the one you have already setup in the Chainloop Chart.
```yaml Platform Chart values.yaml theme={"dark"}
secretsBackend:
# Example of AWS Secret Manager
# similar to https://github.com/chainloop-dev/chainloop/tree/main/deployment/chainloop#use-aws-secrets-manager
backend: awsSecretManager
awsSecretManager:
accessKey: REDACTED
secretKey: REDACTED
region: us-east-1
```
### Step 7 (optional) - Setup SMTP configuration
To enable email notifications, you need to configure the SMTP settings in the Chainloop Platform backend Helm chart `values.yaml` file like this:
```yaml Platform Chart values.yaml theme={"dark"}
backend:
smtp:
host: smtp.example.com # SMTP server hostname
port: 587 # SMTP server port
user: the-user # SMTP server username
password: REDACTED # SMTP server password
from: "Chainloop Notifications " # From email address
```
Without this configuration, the Chainloop platform will not be able to send email notifications for events such as weekly summaries, or org invitations.
### Step 8 (optional) - Configure users auto-onboarding
This step allows automatically onboarding users to specific organizations and user groups.
Follow [this guide](./guides/provisioning) to configure Chainloop Platform for auto-provisioning.
### Step 9 (optional) - Restrict organization creation
This step allows restricting organization creation to specific users.
Follow [this guide](./guides/restrict-org-creation) to configure Chainloop Platform for restricting organization creation.
### Step 10 (optional): Configure Keyless attestation for GitLab
#### 1 - Configure Federated Authentication in Controlplane
Then you'll update the Chainloop Vault controlplane Helm chart values.yaml file like this
```yaml Chainloop Chart values.yaml theme={"dark"}
controlplane:
# enable federated authentication for the attestation
federatedAuthentication:
enabled: true
# Example: http://chainloop-platform-backend.platform-prod.svc.cluster.local/machine-identity/verify-token
url: [your chainloop platform backend hostname]/machine-identity/verify-token
```
#### 2 - Register a GitLab connection
To support [GitLab keyless attestation](/guides/gitlab-keyless), the platform backend needs to be able to authenticate incoming tokens and authorize them against onboarded repositories. Both are handled by **registering a GitLab connection** — no static Helm configuration is required:
* An org admin registers a GitLab connection with the instance host and an access token, following the [Connect GitHub & GitLab](/guides/connect-repository) flow. This lets users onboard GitLab repositories and link them to projects.
* The backend derives the trusted OIDC issuer **automatically** from each registered connection, so incoming GitLab tokens are authenticated without adding a static entry to `backend.machineIdentityIssuers`, and without a redeploy.
See the [GitLab integration (self-hosted)](/guides/deployment/guides/gitlab-app) guide for the (minimal) operator-side details, including the optional webhook secret.
### Step 10 (optional) - Expose MCP server
The Chainloop Model Context Protocol (MCP) server is served by the backend under the `/mcp` path, so it is exposed through the existing backend domain.
This means the MCP server is available at `https://[your-backend-hostname]/mcp`, for example `https://api.app.chainloop.dev/mcp`.
This can be done by updating the platform backend Helm chart values.yaml file like this:
```yaml Platform Chart values.yaml theme={"dark"}
backend:
controlplane_api:
# You can use internal DNS names i.e my-controlplane.internal.svc.cluster.local
# The gRPC endpoint for the controlplane API
# for example chainloop-controlplane-api.chainloop-prod.svc.cluster.local:80
addr: [your-controlplane-gRPC-api-hostname]:[port]
insecure: false # set to true if you don't have enabled TLS authentication in the gRPC API
cas_api:
# You can use internal DNS names
# for example chainloop-cas-api.chainloop-prod.svc.cluster.local:80
addr: [your-cas-gRPC-api-hostname]:[port]
insecure: false
```
### Step 5 - Connect to NATS event bus
Many of the advanced features in Chainloop Platform require the use of the NATS event bus. The platform Helm Chart deployed a Nats.io server, so the next step is to configure the controlplane to connect to it.
To find the hostname, you can query the service like this
```bash theme={"dark"}
kubectl get svc -l app.kubernetes.io/name=nats -o name
service/chainloop-platform-nats
```
In this example, `chainloop-platform-nats` is what you will use as the hostname or the FQDN `chainloop-platform-nats.[my-namespace].svc.cluster.local`. if you are connecting from another namespace.
Then you'll update the Chainloop Vault controlplane Helm chart `values.yaml` file like this:
```yaml theme={"dark"}
controlplane:
# The Chainloop Platform backend exposes a NATS server that can be used to receive audit logs
nats:
# Enable the NATS server
enabled: true
# hostname where the NATS server is running, for example, [nats-service-name].[namespace].svc.cluster.local
host: "my-nats-uri" # for example chainloop-platform-nats.platform-prod.svc.cluster.local
```
This example shows an unauthenticated Nats server configuration. We do not recommend this setup, please make sure you add authentication to your nats server and update the previous settings accordingly.
### Step 6 (optional) - Configure Secret Manager in platform Chart
To enable [notifications integrations](/concepts/notifications), you must configure the secret manager to be able to store and retrieve secrets. The configuration is similar to the one you have already setup in the Chainloop Chart.
```yaml Platform Chart values.yaml theme={"dark"}
secretsBackend:
# Example of AWS Secret Manager
# similar to https://github.com/chainloop-dev/chainloop/tree/main/deployment/chainloop#use-aws-secrets-manager
backend: awsSecretManager
awsSecretManager:
accessKey: REDACTED
secretKey: REDACTED
region: us-east-1
```
### Step 7 (optional) - Setup SMTP configuration
To enable email notifications, you need to configure the SMTP settings in the Chainloop Platform backend Helm chart `values.yaml` file like this:
```yaml Platform Chart values.yaml theme={"dark"}
backend:
smtp:
host: smtp.example.com # SMTP server hostname
port: 587 # SMTP server port
user: the-user # SMTP server username
password: REDACTED # SMTP server password
from: "Chainloop Notifications " # From email address
```
Without this configuration, the Chainloop platform will not be able to send email notifications for events such as weekly summaries, or org invitations.
### Step 8 (optional) - Configure users auto-onboarding
This step allows automatically onboarding users to specific organizations and user groups.
Follow [this guide](./guides/provisioning) to configure Chainloop Platform for auto-provisioning.
### Step 9 (optional) - Restrict organization creation
This step allows restricting organization creation to specific users.
Follow [this guide](./guides/restrict-org-creation) to configure Chainloop Platform for restricting organization creation.
### Step 10 (optional): Configure Keyless attestation for GitLab
#### 1 - Configure Federated Authentication in Controlplane
Then you'll update the Chainloop Vault controlplane Helm chart values.yaml file like this
```yaml Chainloop Chart values.yaml theme={"dark"}
controlplane:
# enable federated authentication for the attestation
federatedAuthentication:
enabled: true
# Example: http://chainloop-platform-backend.platform-prod.svc.cluster.local/machine-identity/verify-token
url: [your chainloop platform backend hostname]/machine-identity/verify-token
```
#### 2 - Register a GitLab connection
To support [GitLab keyless attestation](/guides/gitlab-keyless), the platform backend needs to be able to authenticate incoming tokens and authorize them against onboarded repositories. Both are handled by **registering a GitLab connection** — no static Helm configuration is required:
* An org admin registers a GitLab connection with the instance host and an access token, following the [Connect GitHub & GitLab](/guides/connect-repository) flow. This lets users onboard GitLab repositories and link them to projects.
* The backend derives the trusted OIDC issuer **automatically** from each registered connection, so incoming GitLab tokens are authenticated without adding a static entry to `backend.machineIdentityIssuers`, and without a redeploy.
See the [GitLab integration (self-hosted)](/guides/deployment/guides/gitlab-app) guide for the (minimal) operator-side details, including the optional webhook secret.
### Step 10 (optional) - Expose MCP server
The Chainloop Model Context Protocol (MCP) server is served by the backend under the `/mcp` path, so it is exposed through the existing backend domain.
This means the MCP server is available at `https://[your-backend-hostname]/mcp`, for example `https://api.app.chainloop.dev/mcp`.