> ## Documentation Index
> Fetch the complete documentation index at: https://docs.chainloop.dev/llms.txt
> Use this file to discover all available pages before exploring further.
# Enterprise edition
> How to deploy and configure the Chainloop Enterprise in Kubernetes
This documentation is for the proprietary Chainloop Enterprise. If you are looking for the Open Source Evidence Store documentation, please refer to the [Chainloop Evidence Store](/guides/deployment/oss) guide
## Introduction
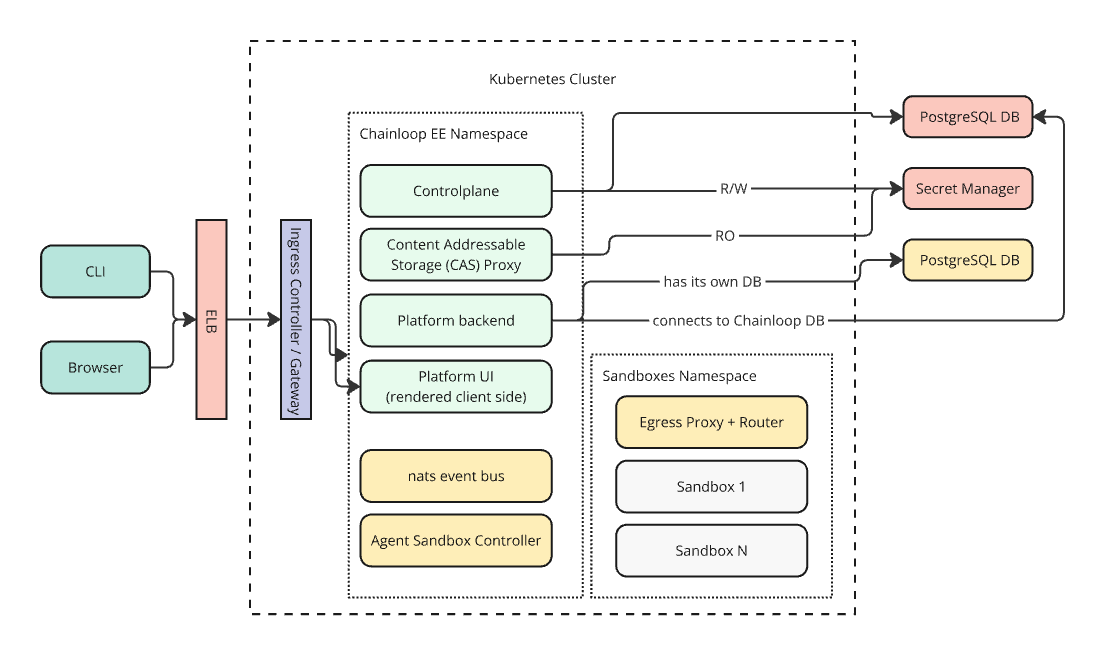
The Chainloop platform has two top-level components: Chainloop Evidence Store and Chainloop Platform. Both components are deployed using one unified Helm Chart called `chainloop-ee` (Chainloop Enterprise Edition).
Once deployed, for example in an AWS Kubernetes cluster, it could look like this:
 ## Retrieve Private OCI Registry credentials.
To pull the Helm Charts and container images you'll need to authenticate with a private OCI registry managed. If you don't have them yet, please [contact](https://app.chainloop.dev/request-access) the Chainloop team.
Once you get the creds, you can give it a try by authenticating locally and pulling the latest version of both Helm Charts.
```bash theme={"dark"}
# Authenticate locally
$ docker login -u [username] -p [creds] chainloop.azurecr.io
# Chainloop Enterprise Edition Chart
$ helm fetch oci://chainloop.azurecr.io/chart/chainloop-ee
$ ls chainloop-*
chainloop-ee-0.326.0.tgz
```
## Configure credentials for deployment
You have two options to consume the provided Helm Charts and container images in your Kubernetes cluster:
### Option 1: Pull images and Chart directly from Private Azure Registry
To pull the images, you'll need to store these credentials as a K8s secret in the cluster where you will deploy the Helm Charts. Later, they will be referenced in the Helm charts as imagePullSecrets.
```bash theme={"dark"}
$ kubectl create secret docker-registry regcred-azure \
--docker-server=https://chainloop.azurecr.io \
--docker-username=[your-username] \
--docker-password=[your credentials]
```
### Option 2: Relocate Helm Chart and images to your own registry
Both charts are compatible with relocation processes performed by the [Helm Relocation Plugin](https://github.com/vmware-labs/distribution-tooling-for-helm). This means that you can easily import the Helm Charts and Container images provided by the Chainloop team into your registry, even behind the firewall.
This is a two-step process (wrap -> unwrap)
* Pull all the container images and Helm chart and wrap them in an intermediate tarball.
* If needed, transfer that tarball to your air-gap environment via an offline medium
* Unwrap the tarball and push container images, update the Helm Chart with new image references, and push it to the target registry.
For example, to relocate from Azure to your own Harbor registry.
```bash theme={"dark"}
helm dt wrap oci://chainloop.azurecr.io/chart/chainloop-ee
# 🎉 Helm chart wrapped into "chainloop-ee-0.326.0.wrap.tgz"
# Now you can take the tarball to an air-gapped environment and unwrap it like this
helm dt unwrap chainloop-ee-0.326.0.wrap.tgz oci://my-repo.harbor.io --yes
# Unwrapping Helm chart "chainloop-ee-0.326.0.wrap.tgz"
# ✔ All images pushed successfully
# ✔ Helm chart successfully pushed
#
# 🎉 Helm chart unwrapped successfully: You can use it now by running "helm install oci://my-repo.harbor.io/chainloop-platform --generate-name"
```
The relocated Helm Charts will be ready to be used, pointing to the images also relocated to the end registry.
## Deploy and Configure in Kubernetes
### Step 1 - Deploy Platform Chart
Please **refer to the Chart README file** that can be found in the chart tarball, which can be pulled like this.
```bash theme={"dark"}
# Pull the chart tarball
helm fetch oci://chainloop.azurecr.io/chart/chainloop-ee
# Print the README from the tarball
tar -xzOf chainloop-ee-*.tgz chainloop-ee/README.md
```
The README includes examples of how to deploy the chart in both **development** and **production** modes.
Next steps:
* Do an end-to-end run of our [getting started guide](/get-started) to test the platform
* Optionally, configure the platform to enhance it with additional features following the steps below
### Step 2 (optional) - Setup SMTP configuration
To enable email notifications, you need to configure the SMTP settings in the Chainloop Platform backend Helm chart `values.yaml` file like this:
```yaml Platform Chart values.yaml theme={"dark"}
backend:
smtp:
host: smtp.example.com # SMTP server hostname
port: 587 # SMTP server port
user: the-user # SMTP server username
password: REDACTED # SMTP server password
from: "Chainloop Notifications " # From email address
```
Without this configuration, the Chainloop platform will not be able to send email notifications for events such as weekly summaries, or org invitations.
### Step 3 (optional) - Configure users auto-onboarding
This step allows automatically onboarding users to specific organizations and user groups.
Follow [this guide](./guides/provisioning) to configure Chainloop Platform for auto-provisioning.
### Step 4 (optional) - Restrict organization creation
This step allows restricting organization creation to specific users.
Follow [this guide](./guides/restrict-org-creation) to configure Chainloop Platform for restricting organization creation.
### Step 5 (optional) - Configure integrations
The platform backend can integrate with external providers to onboard repositories, run SCM checks, support [keyless attestation](/guides/github-keyless), and power AI-assisted Q\&A. Configure the provider(s) you use below.
#### Configure a GitHub App
Chainloop can onboard repositories and run SCM checks through a GitHub App, using App installation tokens instead of user OAuth. It also supports [GitHub keyless attestation](/guides/github-keyless). See the [GitHub permissions reference](/reference/github-permissions#cumulative-permission-set) for the full cumulative permission set.
1. Create a GitHub App (GitHub → Settings → Developer settings → GitHub Apps → New). At a minimum it needs the **Metadata: Read** permission. For the full feature set also grant **Contents** (Read & Write), **Pull requests** (Read & Write), **Issues** (Write), **Checks** (Read & Write), **Administration** (Read) and **Members** (Read).
2. Set the **Webhook URL** to `https://[your-backend-hostname]/github/events` (the backend serves the receiver under `/github/events`), for example `https://api.app.chainloop.dev/github/events`. Set the **Webhook secret** to the same value you put in `backend.githubApp.webhookSecret` below, and subscribe to the events `pull_request`, `issue_comment`, `pull_request_review` and `pull_request_review_comment`.
3. Generate a private key (downloads a `.pem`) and note the **App ID** and the **App slug** (the slug in the App's public URL).
4. Configure the chart:
```yaml Platform Chart values.yaml theme={"dark"}
backend:
githubApp:
appId: 123456
privateKey: |
-----BEGIN RSA PRIVATE KEY-----
...
-----END RSA PRIVATE KEY-----
appSlug: my-chainloop-app # slug from the GitHub App's public URL
baseUrl: https://github.com # optional; set to your GHES host for GitHub Enterprise Server
webhookSecret: "" # shared secret to verify webhook payloads (enables webhook processing)
```
Repositories are then installed per organization from the Chainloop web UI (Repositories → Add Repositories → GitHub).
#### Configure GitLab
Chainloop integrates with GitLab (gitlab.com or self-hosted) through a GitLab OAuth2 application. It also supports [GitLab keyless attestation](/guides/gitlab-keyless).
1. Create a GitLab OAuth2 application (GitLab → Settings → Applications) with the **`read_api`** scope.
2. Note the **Client ID**, **Client Secret** and your GitLab instance URL.
3. Configure the chart:
```yaml Platform Chart values.yaml theme={"dark"}
backend:
oauth2Providers:
- id: gitlab # do not change
url: https://gitlab.com # your GitLab instance URL
clientId: [CLIENT_ID]
clientSecret: [CLIENT_SECRET]
type: ISSUER_TYPE_GITLAB # do not change
```
#### Configure a Slack App
Chainloop can install a Slack App per organization to power AI-assisted Q\&A (Chainloop Ask) from Slack. Create a Slack App at [api.slack.com/apps](https://api.slack.com/apps).
1. Create a Slack App and note its **Client ID**, **Client Secret** and **Signing Secret** (Basic Information → App Credentials), those would be used for the chart.
2. Go to "App Manifest" in the Slack App settings and setup the manifest with the appropriate URLs (note the **backend URL**):
```yaml theme={"dark"}
display_information:
name: Chainloop
description: Supply chain governance, answerable in Slack
background_color: "#1A1A2E"
long_description: Connect your Slack workspace directly to Chainloop with the new native Slack App integration. Once connected, you can pick specific channels for notifications, ask Chainloop directly from your workspace and more.
features:
bot_user:
display_name: Chainloop
always_online: true
oauth_config:
redirect_urls:
- https://[your-backend-hostname]/slack/oauth/callback
scopes:
bot:
- app_mentions:read
- channels:history
- channels:join
- channels:read
- chat:write
- groups:history
- groups:read
- im:history
- im:write
- users:read
- users:read.email
pkce_enabled: false
settings:
event_subscriptions:
request_url: https://[your-backend-hostname]/slack/events
bot_events:
- app_mention
- message.im
- app_uninstalled
- tokens_revoked
interactivity:
is_enabled: true
request_url: https://[your-backend-hostname]/slack/interactivity
org_deploy_enabled: false
socket_mode_enabled: false
token_rotation_enabled: true
is_mcp_enabled: false
```
3. Configure the chart:
```yaml Platform Chart values.yaml theme={"dark"}
backend:
slackApp:
enabled: true
clientId: ""
clientSecret: ""
signingSecret: ""
```
This Slack App (AI-powered Q\&A) is separate from Slack incoming-webhook notifications. Those are set up at runtime in the Chainloop web UI under the organization and product notification settings, not in the chart.
#### Configure Linear
Chainloop integrates with Linear so that issues it creates are attributed to your own Linear app. Each organization installs it through OAuth.
1. Create a Linear OAuth application at [linear.app/settings/api/applications/new](https://linear.app/settings/api/applications/new).
2. Note its **Client ID** and **Client Secret**.
3. Configure the chart:
```yaml Platform Chart values.yaml theme={"dark"}
backend:
linearApp:
enabled: true
clientId: ""
clientSecret: ""
```
### Step 6 (optional) - Test MCP server
The Chainloop Model Context Protocol (MCP) server is enabled by default. It is served by the backend under the `/mcp` path, so it is exposed through the existing backend domain.
This means the MCP server is available at `https://[your-backend-hostname]/mcp`, for example `https://api.app.chainloop.dev/mcp`.
Refer to the [Chainloop MCP server guide](/guides/chainloop-mcp) to learn how to connect to it from your AI clients and agents.
### Step 7 (optional) - Enable Managed CAS
Auto-provision a per-organization S3 Access Point for every org in your installation, backed by a single shared bucket. Removes the need for users to bring their own CAS backend.
Follow [this guide](./guides/managed-cas) to provision the AWS prerequisites and enable the feature.
## Retrieve Private OCI Registry credentials.
To pull the Helm Charts and container images you'll need to authenticate with a private OCI registry managed. If you don't have them yet, please [contact](https://app.chainloop.dev/request-access) the Chainloop team.
Once you get the creds, you can give it a try by authenticating locally and pulling the latest version of both Helm Charts.
```bash theme={"dark"}
# Authenticate locally
$ docker login -u [username] -p [creds] chainloop.azurecr.io
# Chainloop Enterprise Edition Chart
$ helm fetch oci://chainloop.azurecr.io/chart/chainloop-ee
$ ls chainloop-*
chainloop-ee-0.326.0.tgz
```
## Configure credentials for deployment
You have two options to consume the provided Helm Charts and container images in your Kubernetes cluster:
### Option 1: Pull images and Chart directly from Private Azure Registry
To pull the images, you'll need to store these credentials as a K8s secret in the cluster where you will deploy the Helm Charts. Later, they will be referenced in the Helm charts as imagePullSecrets.
```bash theme={"dark"}
$ kubectl create secret docker-registry regcred-azure \
--docker-server=https://chainloop.azurecr.io \
--docker-username=[your-username] \
--docker-password=[your credentials]
```
### Option 2: Relocate Helm Chart and images to your own registry
Both charts are compatible with relocation processes performed by the [Helm Relocation Plugin](https://github.com/vmware-labs/distribution-tooling-for-helm). This means that you can easily import the Helm Charts and Container images provided by the Chainloop team into your registry, even behind the firewall.
This is a two-step process (wrap -> unwrap)
* Pull all the container images and Helm chart and wrap them in an intermediate tarball.
* If needed, transfer that tarball to your air-gap environment via an offline medium
* Unwrap the tarball and push container images, update the Helm Chart with new image references, and push it to the target registry.
For example, to relocate from Azure to your own Harbor registry.
```bash theme={"dark"}
helm dt wrap oci://chainloop.azurecr.io/chart/chainloop-ee
# 🎉 Helm chart wrapped into "chainloop-ee-0.326.0.wrap.tgz"
# Now you can take the tarball to an air-gapped environment and unwrap it like this
helm dt unwrap chainloop-ee-0.326.0.wrap.tgz oci://my-repo.harbor.io --yes
# Unwrapping Helm chart "chainloop-ee-0.326.0.wrap.tgz"
# ✔ All images pushed successfully
# ✔ Helm chart successfully pushed
#
# 🎉 Helm chart unwrapped successfully: You can use it now by running "helm install oci://my-repo.harbor.io/chainloop-platform --generate-name"
```
The relocated Helm Charts will be ready to be used, pointing to the images also relocated to the end registry.
## Deploy and Configure in Kubernetes
### Step 1 - Deploy Platform Chart
Please **refer to the Chart README file** that can be found in the chart tarball, which can be pulled like this.
```bash theme={"dark"}
# Pull the chart tarball
helm fetch oci://chainloop.azurecr.io/chart/chainloop-ee
# Print the README from the tarball
tar -xzOf chainloop-ee-*.tgz chainloop-ee/README.md
```
The README includes examples of how to deploy the chart in both **development** and **production** modes.
Next steps:
* Do an end-to-end run of our [getting started guide](/get-started) to test the platform
* Optionally, configure the platform to enhance it with additional features following the steps below
### Step 2 (optional) - Setup SMTP configuration
To enable email notifications, you need to configure the SMTP settings in the Chainloop Platform backend Helm chart `values.yaml` file like this:
```yaml Platform Chart values.yaml theme={"dark"}
backend:
smtp:
host: smtp.example.com # SMTP server hostname
port: 587 # SMTP server port
user: the-user # SMTP server username
password: REDACTED # SMTP server password
from: "Chainloop Notifications " # From email address
```
Without this configuration, the Chainloop platform will not be able to send email notifications for events such as weekly summaries, or org invitations.
### Step 3 (optional) - Configure users auto-onboarding
This step allows automatically onboarding users to specific organizations and user groups.
Follow [this guide](./guides/provisioning) to configure Chainloop Platform for auto-provisioning.
### Step 4 (optional) - Restrict organization creation
This step allows restricting organization creation to specific users.
Follow [this guide](./guides/restrict-org-creation) to configure Chainloop Platform for restricting organization creation.
### Step 5 (optional) - Configure integrations
The platform backend can integrate with external providers to onboard repositories, run SCM checks, support [keyless attestation](/guides/github-keyless), and power AI-assisted Q\&A. Configure the provider(s) you use below.
#### Configure a GitHub App
Chainloop can onboard repositories and run SCM checks through a GitHub App, using App installation tokens instead of user OAuth. It also supports [GitHub keyless attestation](/guides/github-keyless). See the [GitHub permissions reference](/reference/github-permissions#cumulative-permission-set) for the full cumulative permission set.
1. Create a GitHub App (GitHub → Settings → Developer settings → GitHub Apps → New). At a minimum it needs the **Metadata: Read** permission. For the full feature set also grant **Contents** (Read & Write), **Pull requests** (Read & Write), **Issues** (Write), **Checks** (Read & Write), **Administration** (Read) and **Members** (Read).
2. Set the **Webhook URL** to `https://[your-backend-hostname]/github/events` (the backend serves the receiver under `/github/events`), for example `https://api.app.chainloop.dev/github/events`. Set the **Webhook secret** to the same value you put in `backend.githubApp.webhookSecret` below, and subscribe to the events `pull_request`, `issue_comment`, `pull_request_review` and `pull_request_review_comment`.
3. Generate a private key (downloads a `.pem`) and note the **App ID** and the **App slug** (the slug in the App's public URL).
4. Configure the chart:
```yaml Platform Chart values.yaml theme={"dark"}
backend:
githubApp:
appId: 123456
privateKey: |
-----BEGIN RSA PRIVATE KEY-----
...
-----END RSA PRIVATE KEY-----
appSlug: my-chainloop-app # slug from the GitHub App's public URL
baseUrl: https://github.com # optional; set to your GHES host for GitHub Enterprise Server
webhookSecret: "" # shared secret to verify webhook payloads (enables webhook processing)
```
Repositories are then installed per organization from the Chainloop web UI (Repositories → Add Repositories → GitHub).
#### Configure GitLab
Chainloop integrates with GitLab (gitlab.com or self-hosted) through a GitLab OAuth2 application. It also supports [GitLab keyless attestation](/guides/gitlab-keyless).
1. Create a GitLab OAuth2 application (GitLab → Settings → Applications) with the **`read_api`** scope.
2. Note the **Client ID**, **Client Secret** and your GitLab instance URL.
3. Configure the chart:
```yaml Platform Chart values.yaml theme={"dark"}
backend:
oauth2Providers:
- id: gitlab # do not change
url: https://gitlab.com # your GitLab instance URL
clientId: [CLIENT_ID]
clientSecret: [CLIENT_SECRET]
type: ISSUER_TYPE_GITLAB # do not change
```
#### Configure a Slack App
Chainloop can install a Slack App per organization to power AI-assisted Q\&A (Chainloop Ask) from Slack. Create a Slack App at [api.slack.com/apps](https://api.slack.com/apps).
1. Create a Slack App and note its **Client ID**, **Client Secret** and **Signing Secret** (Basic Information → App Credentials), those would be used for the chart.
2. Go to "App Manifest" in the Slack App settings and setup the manifest with the appropriate URLs (note the **backend URL**):
```yaml theme={"dark"}
display_information:
name: Chainloop
description: Supply chain governance, answerable in Slack
background_color: "#1A1A2E"
long_description: Connect your Slack workspace directly to Chainloop with the new native Slack App integration. Once connected, you can pick specific channels for notifications, ask Chainloop directly from your workspace and more.
features:
bot_user:
display_name: Chainloop
always_online: true
oauth_config:
redirect_urls:
- https://[your-backend-hostname]/slack/oauth/callback
scopes:
bot:
- app_mentions:read
- channels:history
- channels:join
- channels:read
- chat:write
- groups:history
- groups:read
- im:history
- im:write
- users:read
- users:read.email
pkce_enabled: false
settings:
event_subscriptions:
request_url: https://[your-backend-hostname]/slack/events
bot_events:
- app_mention
- message.im
- app_uninstalled
- tokens_revoked
interactivity:
is_enabled: true
request_url: https://[your-backend-hostname]/slack/interactivity
org_deploy_enabled: false
socket_mode_enabled: false
token_rotation_enabled: true
is_mcp_enabled: false
```
3. Configure the chart:
```yaml Platform Chart values.yaml theme={"dark"}
backend:
slackApp:
enabled: true
clientId: ""
clientSecret: ""
signingSecret: ""
```
This Slack App (AI-powered Q\&A) is separate from Slack incoming-webhook notifications. Those are set up at runtime in the Chainloop web UI under the organization and product notification settings, not in the chart.
#### Configure Linear
Chainloop integrates with Linear so that issues it creates are attributed to your own Linear app. Each organization installs it through OAuth.
1. Create a Linear OAuth application at [linear.app/settings/api/applications/new](https://linear.app/settings/api/applications/new).
2. Note its **Client ID** and **Client Secret**.
3. Configure the chart:
```yaml Platform Chart values.yaml theme={"dark"}
backend:
linearApp:
enabled: true
clientId: ""
clientSecret: ""
```
### Step 6 (optional) - Test MCP server
The Chainloop Model Context Protocol (MCP) server is enabled by default. It is served by the backend under the `/mcp` path, so it is exposed through the existing backend domain.
This means the MCP server is available at `https://[your-backend-hostname]/mcp`, for example `https://api.app.chainloop.dev/mcp`.
Refer to the [Chainloop MCP server guide](/guides/chainloop-mcp) to learn how to connect to it from your AI clients and agents.
### Step 7 (optional) - Enable Managed CAS
Auto-provision a per-organization S3 Access Point for every org in your installation, backed by a single shared bucket. Removes the need for users to bring their own CAS backend.
Follow [this guide](./guides/managed-cas) to provision the AWS prerequisites and enable the feature.